Fixing Black Print Results on Entire Paper in Windows 10/11
When you print or print a document or whatever, you may find that the printout is black on the whole paper. This problem is like you are printing the document with the color reversed from the actual one. For example, if you print a document in black and white, then your black font will appear in white and the white color will be black.
This problem occurs because of a printer configuration error. Many users reported that they were also facing the same error when they were printing documents on their printer. If you are also facing the same error on your printer, then you can continue reading this article. In this article, I will provide some solutions on how you can fix this error.
Fixing Black Print Results on Entire Paper in Windows 10/11
If your printer prints in reverse color, then here are some solutions you can follow to fix this problem.
1. Change Advanced Settings from Printer
If your printer prints in reverse color, there may be a problem in your printer’s Advanced Settings. In this case, you need to change your printer’s Advanced Settings. The printer has an option in Advanced Settings that controls whether the document prints normally or in reverse colors. You must ensure that you have enabled the correct settings on your printer. For that, follow the steps below to change your printer’s Advanced Settings.
Di Windows 10:
- Press the button Win + I to open Settings Windows and select Devices in the Settings window.
- On the next page, click Printer & scanner in the left pane.
- In the right pane, click printer you and Manage.
- Next, click Printer properties.
- In the Properties window, switch to the tab Advanced and then click Printing Defaults.

- Then click on options Advanced in the new window that appears.
- After that, click Other Print Options in a new window.
- Then click option Print Text in Black in the left pane and give a checklist on options Print Text in Black.
- Now, click OK on all three windows that open to save changes.
Di Windows 11:
- Press the button Win + I to open Settings Windows.
- In the Settings window, click Bluetooth & devices in the left pane and click Printer & scanners in the right pane.
- On the next page, select printer you.
- Next, click Printer properties.
- In the Properties window, switch to the tab Advanced and then click Printing Defaults.

- Then click on options Advanced in the new window that appears.
- After that, click Other Print Options in a new window.
- Then click option Print Text in Black in the left pane and give a checklist on options Print Text in Black.
- Now, click OK on all three windows that open to save changes.
Hopefully the above method can solve the reverse color problem on your printer. If not, then move on to the next method. In addition, many users have problems with how to enable Color printing on the printer. If you also have it, then you can follow the article below.
2. Change Your Printer Driver
If the changes in Advanced Settings do not apply to this problem, then you need to change your Printer driver. In this method, you need to uninstall your printer and add another one. So, to change the printer driver, follow the steps below.
- Press the button Win + Rthen type control and press Enter to open Control Panel.
- In the Control Panel window, change View by the Large/Small icons and select Devices and Printers.
- Then right click on your printer and click Remove device.

- If the system asks you to remove the driver, click Yes.
- Now, go to the top and click Add a Printer and after that your system will start looking for printers connected to your network.
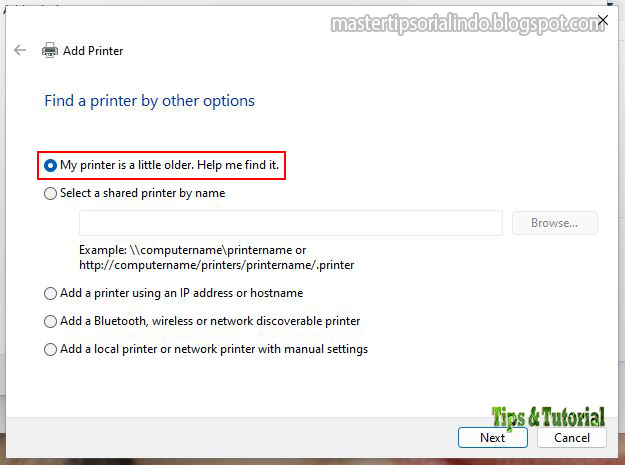
- Now, in the list of given printers, click The printer that I want isn’t listed even if your printer is on the list.

- In the new window that appears, click My printer is a little older. Help me find it and click Next.
- After that, Windows will start searching for printers connected to the network.
- If you see a message that says The driver is already installedfor give a checklist on options Replace the current driver and click Next.
- You can change or leave the default printer name as is and click Next.
- After that select the option Printer sharing you and click Next.
- Then set your printer as default printer and click Finish.
- After that try to print a text document.
This will definitely fix your printer’s reverse color problem. If your printer prints a blank page on your Windows 10 or Windows 11, then you can follow the article below.
Printer prints blank page on Windows 10 or Windows 11
Your printer may print a blank page when you want to print your document. This problem occurs for several reasons below.
- This problem may occur because the ink cartridge is empty.
- It could happen because of the wrong cartridge installation.
- Due to the wrong paper size.
- There might be a printer driver problem.
- There might be a software related problem.
To fix this, you need to check the ink in your printer cartridge and install it properly. You also need to check the paper size of the Print window. If the problem persists, you need to download your printer driver via Device Manager or check it in Windows Update. You can also reinstall the driver, if updating the driver doesn’t fix it.
Hope that helps you! You can then read my other articles about how to enable or disable File and Printer Sharing in Windows 10/11 or how to find IP Address of Network Printer.
That’s it for this tutorial. Hopefully it will be useful and help you in improving the black print on the entire paper in your Windows 10 or Windows 11. Don’t forget to leave your comments below to share your thoughts and experiences in following this tutorial. Thank you and GBU. UNITE AGAINST COVID-19!!

Posting Komentar untuk "Fixing Black Print Results on Entire Paper in Windows 10/11"