How to Configure Password Usage for Fixed Data Drive in BitLocker
If you want to set various policies for using passwords on BitLocker fixed data drives in Windows 10 or Windows 11, then here’s how to do it. You can configure the use of passwords for BitLocker fixed data drives using the Group Policy Editor and Registry Editor. It is possible to enable or disable passwords for fixed data drives, password complexity and minimum password length using the guides in this article.
How to Configure Password Usage for Fixed Data Drive in BitLocker
As discussed above, you can use the Group Policy Editor and Registry Editor methods. You can follow one of them according to your needs. So let’s look at both methods in detail.
1. Using the Group Policy Editor
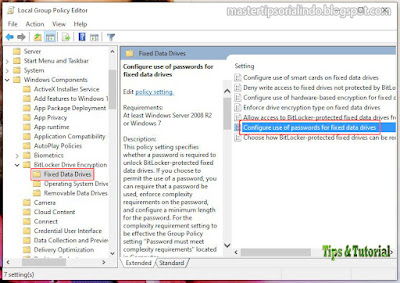
To configure the use of passwords for fixed data drives in BitLocker using the Group Policy Editor, you can follow these steps.
- Press the button Win + Rthen type gpedit.msc and press Enter to open Group Policy Editor on your computer.
- In the Local Group Policy Editor window, browse the following path below this.
Computer Configuration – Administrative Templates – Windows Components – BitLocker Drive Encryption – Fixed Data Drives
- At location, double click on policy Configure use of passwords for fixes data drives in the right pane.
- Then in the policy edit window, select the option Enabled.
- Next in the Options section, to configure the use of a password for a fixed data drive, use the three options there to set it up:
- Require password for fixed data drive: You can check this option to enable it.
- Configure password complexity: Select the desired password complexity.
- Minimum password length: Select the minimum password length.
- Finally, click Apply and OK to save your settings.
2. Using Registry Editor
- Press the button Win + Rthen type regedit and press Enter to open Registry Editor.
- In the Registry Editor window, browse the following path below this.
HKEY_LOCAL_MACHINE\SOFTWARE\Policies\Microsoft
- At location, right click on Microsoftthen select New – Key and name it with FVE.
- Then, right click on FVE or empty space in the right pane, then select New – DWORD (32-bit) Value and name it with FDVPassphrase.
- After that, double click on DWORD FDVPassphrasethen change value data Becomes 1 and click OK.
- The next step, you need create three more DWORD and name it as follows.
- FDVEnforcePassphrase: 1 to activate.
- FDVPassphraseComplexity: 0/1/2
- FDVPassphraseLength: 6 to 20 characters.
- After creating the DWORD, double click on each DWORD and value data as mentioned above.
- Finally, close the Registry Editor window and restart your computer.
manage-bde -changepin C:
That’s it for this tutorial. Hope this is useful and helps you in configuring the use of passwords for fixed data drives on BitLocker on your Windows 10 or Windows 11. Don’t forget to leave your comments below to share your thoughts and experiences in following this tutorial. Thank you and GBU. UNITE AGAINST COVID-19!!


Posting Komentar untuk "How to Configure Password Usage for Fixed Data Drive in BitLocker"